
Creating or Editing a CFX Run
In BR.io, you can create, edit, and save runs that you can then access and start from the instrument.
Important: Before creating a pending run in BR.io, you must create at least one protocol that you select as part of the setup process. For information, see Managing PCR Protocols. If you have already created the protocol you will use in your experiment, go to Selecting a Protocol.
Tip: If you choose to create a run from your connected instrument to quickly start the run, you can select a protocol from the instrument touch screen and set the Save location for the protocol to BR.io before you start the run. Any subsequent changes to the protocol from the instrument are reflected in BR.io when the run starts. You can also edit the plate layout during the run or after the run is completed. For information, refer to the CFX Opus 96, CFX Opus 384, and CFX Opus Deepwell Real-Time PCR Systems Instrument Guide (catalog no. 10000119983).
Note: You can choose to receive email notifications that alert you when a run is completed. See Receiving Email Notifications When Your Run is Completed.
For information on creating templates that you can use to set up CFX runs, see Creating and Using Run Templates.
To create a pending CFX run
| 1. | Click the Create icon in the left panel to open the BR.io Create page. |
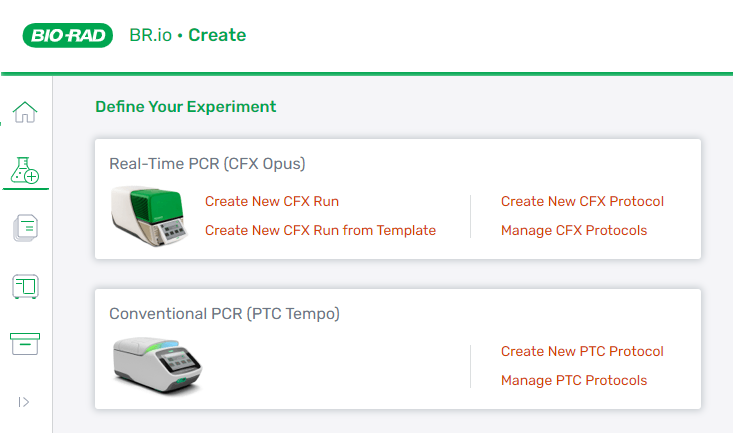
| 2. | Under Define Your Experiment, CFX (real-time PCR) .click one of the following: |
| ● | Create New CFX Run |
| ● | Create CFX Run from Template (see Creating and Using Run Templates) |
The Select a Protocol page appears.
![]()
| 3. | Continue to Selecting a Protocol. |
To edit a pending CFX run
| 1. | Click the Files icon on the left, and then navigate to and open the applicable pending run file. |
The file opens to the Run details page.
| 2. | Edit the run, as applicable. |
You can edit the run details, and you can also navigate to the plate pages to make edits.
Important: You cannot edit the protocol in this view. For information, see Managing CFX Protocols.
See also